Are you a hairstylist that wants to learn how to attach a men’s hair piece for your clients? Or do you plan to wear a non-surgical hair replacement system and attach it yourself? You have read lots of articles about men’s hair piece installation guides. Perhaps, you have already watched a few detailed tutorials about how to put on a toupee. You need an extended step-by-step guide to get it applied correctly.
People wear stylish hair systems for many reasons. Some people like a new look that boosts their confidence. While others want to cover their increasing baldness and thinning hair. However, not all hair toupee wearers know how to attach a toupee to their heads. People usually seek help from a professional hairstylist for a hair system application.
But if you are not yet familiar with the proper way to attach a toupee to one’s head, then you’re in the right place. New Times Hair is here to teach you a new and profitable skill. We have compiled the best STEP-BY-STEP MEN’S HAIR PIECE INSTALLATION tutorial.
We hope that this guide helps you apply a hair system like a pro. Let’s get started.
Attention: This guide is written especially for hair professionals. If you are a personal wearer, we highly recommend you look for a salon or hairstylist that provides hair system fitting and styling services in your local in case of wrong attachment or even damage.
- Related: 12 Best Tape and Glue for Men’s Toupee and Hairpieces
- Related: How to Get Glue or Tape out of Hair Pieces or Wigs
- Related: My New Hair System is not Sticking, This Will Help!
- Related: What Is a Toupee and Find the List of Top 10 Best Men’s Toupee
- Related: Hair Frontal Installation and Styling Tutorial
Necessary Tools for Men’s Hair Piece Installation
Learning men’s hair system installation can be exciting. First, you need to order a hair system from your local supplier or online. Check New Times Hair men’s toupee catalog if you still don’t have one! Get $50 off for your first order with the code BLOG50, you can also get the wholesale price if you are going to order in bulk.
Men
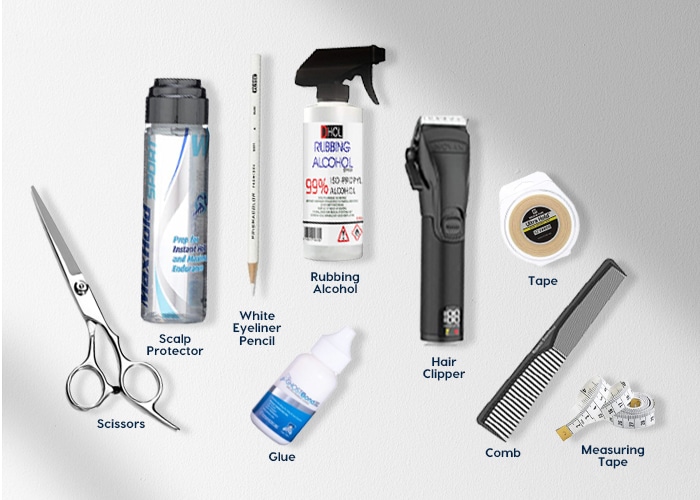
Besides, you also have to make sure that you have the following tools for a streamlined hair system application:
- Comb, Balder, 99% alcohol wipes/spray, Scalp protector, Scissors, White eyeliner pencil, Glue/tape, Measuring tape
Men’s Hair Piece Installation Step by Step Guide
Whether you’re a budding hairstylist or you just want to learn the best practices for men’s hair piece installation, it’s vital to learn how to install it properly. Following the proven steps of how to put on a hair system can save you from pitfalls during the application process.
Step 1. Prepare the Scalp for the Hair System Installation
The first thing to do is to prepare the scalp of your client for a hair system installation.
At this step, you will need a template to help you divide the area where you will attach the new hair system.
You can make a template for each of your clients following our instructions on how to make a toupee template(click to check). You can also follow the easy method in the video below to make the template with a head template replicator(click to shop).
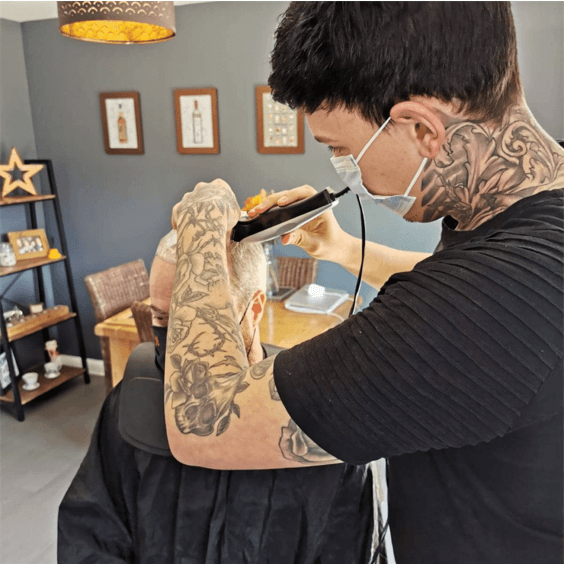
Once got the head template, you can use a razor for the areas around the head for sectioning.
If your client is a man, he may have bald spots on top of his head. So, the second thing to do to prepare the scalp is to shave off the existing hair in the balding area. Make sure to clean-shave the entire section using a balder so that the toupee will stick well to the skin.
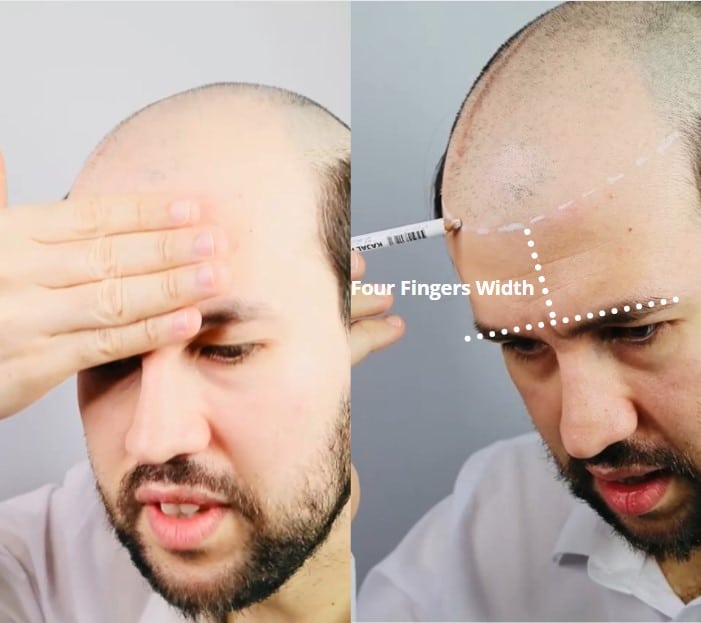
The next step is to choose where you want to place the toupee and mark the correct part on the forehead. Most hairstylists usually use four fingers to mark the area of the hairline. Locate the hairline by placing your four fingers between the eyebrows. Stack your fingers up towards the hairline. The space next to your fourth finger will be the hairline. Mark the areas of the hairline using white eyeliner.
Step 2. Cutting the Base of the Hair System to Size
People have different size heads and you’ll need to account for that. You need to make sure that the size of the hair system fits perfectly to the unique needs of the client.
You can ask for a cutting base service from your supplier when you place the order. At New Times Hair, it only takes $10 dollars.
You can also choose to cut the base to size yourself. Cutting the base of the hair system may seem hard in the beginning. But with proper tools and the right instructions, you can easily cut the base without damaging the hair system.
- Step 1: Following the edge of the template we mentioned above to draw the exact size that you need for the hair system.
- Step 2: Now, before you begin to cut the excess part base of the hair system, pull the hair back behind the line. This can help prevent you from cutting the hair when you are removing the excess part of the base.
- Step 3: Cut the line carefully using your scissors.
Step 3. Remove Any Possible Oils or Residues
Cleaning is the next essential thing to do before the new hair system application.
The scalp of the client may have unseen signs of oil and dirt. That is why it is important to make sure you clean and dry the head before you put on the toupee. Clean the scalp by spraying a 99% alcohol solution on the scalp. Use a wipe to gently remove any dirt and oils.
You can repeat this step several times to ensure that no oil and residue remain on the scalp. Also, wipe or gently massage the head with the alcohol. The alcohol will ensure that your hands will remain clean as well. Afterward, leave the scalp to dry. If you want to dry the scalp faster, you can use a blow dryer as well. Remember that the cleaner the scalp, the better the hair system will secure to the scalp.
Meanwhile, you need to ensure that the hair system and its base is clean and dry as well. You can spray or wipe alcohol on the base of the hair system.
There are feedbacks from our clients that their new hair system just doesn’t adhere to any tapes or glue, this is largely related to a special production process called “grease conditioning”, which can make the base less reactive to the adhesives. We suggest you fully shampoo and clean the hair system if it is a completely new one. Click to check out our guide on what to do if your tape doesn’t stick to new hair systems.
Clean until both the hair system and the scalp is dried before hair system installation. This will ensure that the hair system sticks well to head and lasts long.
This preparation work is VERY IMPORTANT and NECESSARY, it decides how long and securely your hair system will stay on head.
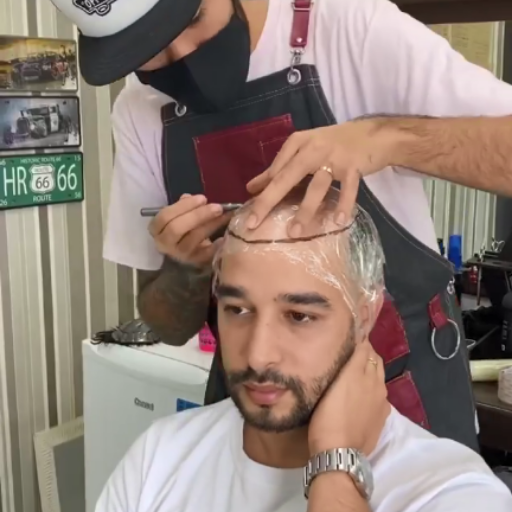
Step 4: Apply Scalp Protector on The Scalp
This step is optional. But if your clients have sensitive skin, you should consider using a scalp protector. A scalp protector prevents the scalp from dermal irritations. This solution serves as a shield against possible adverse reactions from the toupee adhesives.
The hair system may also easily loosen when the wearer lives in a high humidity area. Likewise, if the wearer loves to swim, the bond of the hair system to the scalp can come loose. A scalp protector not only shields the scalp, but also secures the hair unit for a longer time. Thus, improving the firmness of the hair replacement system.
Take the time to talk with your client further. Ask the right questions to understand their skin, lifestyle, and climate conditions so you can decide whether to apply a scalp protector. Understanding your client will help you best serve their needs.
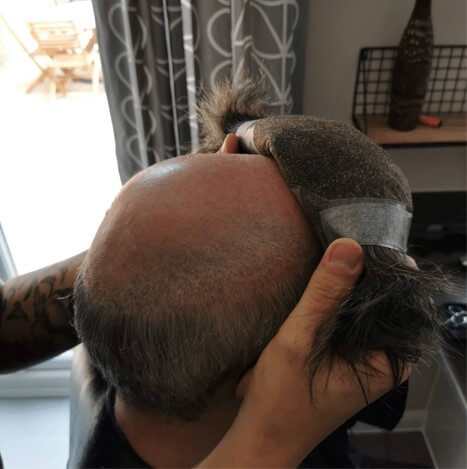
Step 5. Hair System Attachment
Attaching the hair system to head is the most anticipated part of the hair system installation.
The hair system application requires accuracy and patience. You need to put enough pressure to help the adhesive stick well with the base of the hair system and the scalp. You should also be gentle so as to not damage the hair system itself.
Hair system tape and glue are two of the most often used adhesives to attach toupee. Still not sure what to use for the installation? Here are the 12 Best Tape and Glue for Men’s Toupee and Hairpieces installation. And this guide can help you choose between Tape vs. Glue.
Before you attach the hair system to the head, apply a few layers of glue to the scalp. The first layer of the glue should be put all over the scalp without touching any hair outside the shaved area. Using a clean spatula, spread the glue without missing a spot. The first layer of adhesives should be left to dry prior to applying the second application. And the second layer should be left to dry before the application of the third layer.
While waiting for the glue to dry on the scalp, you can start applying the same glue to the base of the hair system. Apply the glue on the base of the toupee once. After that, you can carefully begin to attach the hair system to the head of the client. Start from one end of the base while following the division and the marks that you made earlier using the eyeliner.
Press the hair system firmly to the scalp to avoid air bubbles and wrinkles. Be sure to flatten the hair system without leaving damage.
Step 6. Haircutting and Styling
The last step for the men’s toupee installation is haircutting and styling.
During your initial consultation with your client, discuss the flow of the process. You can ask his or her style preference so you will know how to cut and style the hair after attaching it.
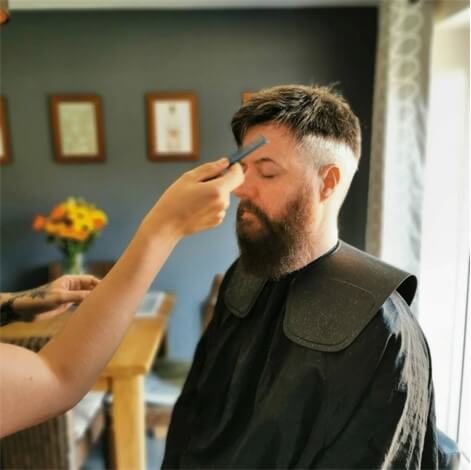
Style the hair as your customer has requested. Be sure to mix the hair of the hair system with the customer’s natural hair to achieve a more natural-looking look. You can also use styling powders to finish the look. Keep in mind that the bond will take a while to cure. Don’t pull the hair too tight while cutting or styling it. Be sure not to use harsh chemicals or styling products on the hair system while it is still curing.
If you prefer to skip this step, you can also order a haircutting service from New Times Hair. Our professional hairstylists will be happy to assist you when you place your order. Contact our team to learn more about your styling options.
Tips to Keep the Hair System Stay on Head Longer
A well-placed hair system usually can last on the scalp for 3-4 weeks with proper care and maintenance. A properly installed hair system enhances the overall look and confidence of a person. But sometimes, life happens and the system becomes loose. Your client may call you a few days after the hair system installation is done.
When the hair system has lost its tack, you should fix the problem immediately. However, take careful precautions to not let the same incident to happen again. Follow the following tips to keep the hair system in place. To ensure that it stays in place, explain best practices to your client as well.
Here are proven tips that can help prevent the hair system from falling off
● Ensure that the scalp and the hair system are thoroughly cleaned and dried
Before you put together the scalp and the hair system, make sure that both areas are clean and sanitized. Any dirt or residue from the skin or the base can affect the strength of the bond. Likewise, you need to wait until the scalp and the base of the hair system are dry before applying.
● Apply more pressure on the hair system to set it in place
After successful hair system installation, you can gently massage the scalp to help the base and skin bond well together. A little more pressure on the hair system can help the glue stick well on the scalp. Some customers love the relaxed feeling of a head massage. So, a little more pressure won’t hurt.
● Use an extended wear hair system tape, stronger tape, or waterproof tape
Use an extended wear hair system tape. A stronger, waterproof tape can lengthen the lifespan of the hair system’s adhesion to the scalp.
● Use a good scalp protector
The scalp protector is a holy grail for the hair system application. They are essential for clients who are highly active. They also act as a good barrier against daily chemicals like shampoos.
What to do When the Toupee Getting Loose
Reattaching Loose Hair System
Adhesives do not last forever, even if you choose a reinforced one, the hair toupee will still get loose over time. Especially when it often gets wet from water, rain, or sweat, the adhesives can weaken.
However, your hair toupee will feel loose long before the adhesive fails entirely.
Ask your client to take some time every other day to check if the hair system loses it to track. Once noticed a part of the edge gets loose, take some time to properly attach the loose part with tape or glue.
This will ensure the secure fit of your hair toupee on the scalp and will not fall off.
Removing and Reattaching Hair Systems
For glue on hair toupee, it typically needs to be removed, completely cleaned and reattached every three to four weeks.
You will need to dissolve the adhesives with C-22 adhesive solvent and peel it off completely from the scalp and the hair system, prepare the scalp again and finally reattach the hair toupee to the scalp.
For the complete process, you can check out our guide Hair System Removal and Scalp Cleaning.
FAQs
Q1: There are white flakes on the scalp after I clean it with alcohol, is this normal?
Yes. The appearance of white flakes is a positive sign for cleaning. It means that the scalp is cleaned extensively and no oil is remaining. The dry scalp will help the hair systems stick to the scalp. The glue will have an easier time bonding with the scalp.
Q2: What if my client doesn’t want to shave the top of the scalp?
Some clients may refuse to let their thinning hair be shaved. And that is completely understandable. Shaving the hair can be scary for someone who’s losing his or her hair. But the adhesive or glue will only bond well with a smooth and shaved surface.
However, there are other solutions to bond the hair system without using glue. A clip-on hair system may be the best alternative for clients who don’t want their hair shaved. The clips at the back of the toupee wigs are also easy to wear and remove. Clip-on wigs are best for people who want to let their scalp breathe daily. You can sew the clips on yourself. If you want to save more time, you can ask for a sewing clip service from us when you place your order.

Q3: What if your customer is allergic to tape or glue? What if the client doesn’t want to use tape or glue?
If your client is allergic to the ingredients used in the tape or glue, use the clip-on hair system. Make sure to discuss the health conditions and preferences of the clients. This way, you can provide them with the best service possible.
Q4: My client has a very sensitive scalp; how do I work with it?
After learning that your client has a sensitive scalp, you have two options. Before completing the hair system installation, try the following:
1. Use the scalp protector before adhesives.
2. Use a clip-on hair system.
Summary
The demand for professional hairstylists is on the rise. Along with this is the need for stylists that understand how to attach a hair system. Hair system installation is a must-learn skill if you want to scale your hair salon business. Likewise, if you desire to learn a new and profitable skill, understanding the non-surgical hair replacement system is worth the investment into yourself.
New Times Hair is here to provide you with an exceptional quality hair system. Whether you want a custom glue-on hair system or a clip-on hair system, we can provide them all. Our human hair wigs are the highest standard for hair system installation or replacement.
We hope that you find this men’s hair piece installation guide helpful. Browse our shop for the best in hair systems. Don’t forget to leave a comment below for any questions or any future topics you would like to see on our blog.
If you are own a hair business or you are planning to order hairpieces in bulk, do not hesitate to become our wholesaler and get our hidden wholesale price! Click to apply.


